Do it yourself hedgehog cages
If you are looking for a cheap and
easily expandable cage for your hedgehog, you may want to look into
making your own out of plastic storage tubs. Plastic storage tubs
are light weight, which makes them easy to move and clean, and are
easily expandable. Below you will find some directions that I used
when I built a cage out of 2 storage tubs.
The basics
First you will need to find large clear plastic tubs. Look at Wal-Mart, K-mart or
even your local hardware store in their storage container aisles.
While those that have lids which are not removable are fine, try to
buy one which you can take the lid off easily. Plus all the
additional items to put in the cage.
Layout
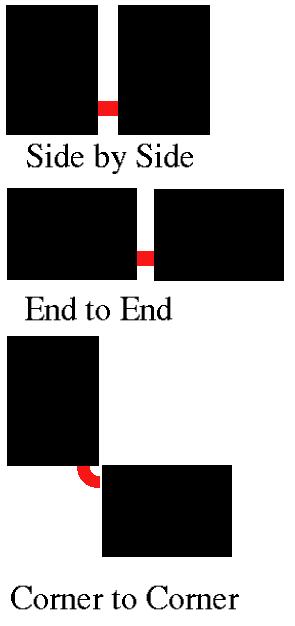
Next, decide how you want the tubs connected. For example, do you want the
tubs to sit side by side, end to end, or even corner to corner (see
diagram below). Depending on the placement of the cages, will
determine what type of tube you will be using to connect the tubs.
|
Lids
You may or may not need a lid for you hedgehog. It will depend if you hedgehog is a
climber and how tall the sides of the tub are.
Lid instructions:
From each end and 1" from each side, use a pencil to mark the
lines to be cut. Then, use a drill with a 1/4" bit to cut holes
in the corners of the lines so that wire
cutters can be inserted. Then use wire cutters to cut out the middle of the lid.
After that, cut insect screening to the correct size to fit the hole.
Hot glue each corner down for stability, then come back and glue down
the sides with one continuos bead of glue. Repeat for the other lid.
This type of lid
should give your hedgehog plenty of air circulation, keep them in
their cage, and it doesn't look too bad.
|
Cutting the holes
I have heard of so many people breaking
or cracking the tubs when they try to cut in to them with a knife.
To prevent the plastic from cracking, use a hair dryer to warm the
area that you plan to cut. Then use a drill to make a small hole to
start the cut. For ease of use, I have found that a Dremel (hand
rotary tool) works the best with a cutting bit on it. Others have
used wire snips, soldering irons/wood burning tools, etc. to cut the
plastic. I recommend cutting the hole a little small at first then
shaving the sides down until the tube you are using to connect the
tubs with fits snug.
Once the holes are cut, ensure that
there are no rough edges, clean the inside of the containers
thoroughly, there will be bits of plastic inside the containers that
needs removed to prevent a hedgehog from accidentally ingesting some.
Place the containers in the location you want your hedgehog's new
home, insert the tubes, and arrange the new cage in a fashion that
your hedgehog would like.
Material List
- 2 clear plastic containers
- Tube to connect containers
- For the side by side or end to end
cages you will need a 1' length (length can be shorter) of 4"
PVC pipe (or a straight ferret tube)
- For the Corner to corner get a PVC
pipe elbow, or a corner ferret tube.
- Insect screening (large enough to
cover the top of both cages)
- Wire Cutters
- Dremel
- Saw (to cut the pvc pipe)
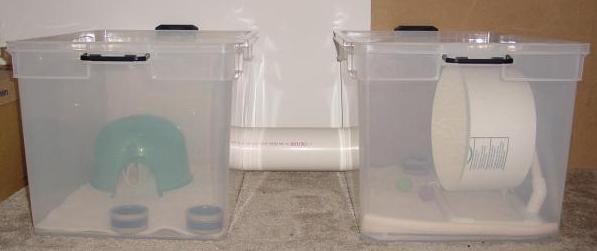
Finished product
Below is a picture of a cage built out of 2 plastic storage containers and a 1 foot
length of PVC pipe. The space between the cages makes a great
storage spot for treat containers.
Other Notes
|
A few additional notes, if you want to attach a water bottle to the
cage, drill a hole at the appropriate height on one side of a
container, put the nozzle through the hole and attach the bottle to
the outside of the cage. This will help keep the water bottle from
being climbed on and knocked off the cage.
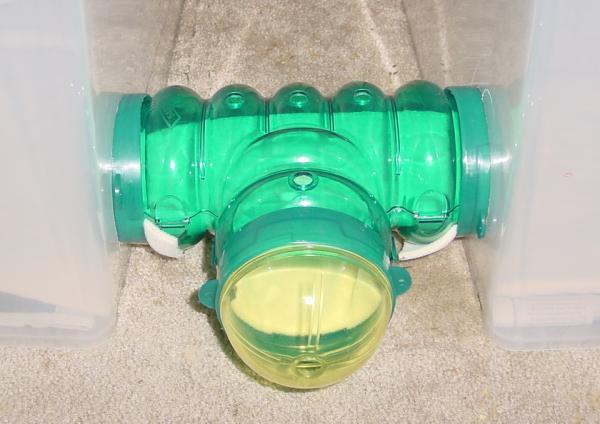
Also note that if
you would like an entrance to the cage that the hedgehogs can get in
and out of at will, I have found that using a ferret T shaped tube
with a bubble plug, works great. I line the tube with a piece of
vellux to prevent hedgie feet from falling through the holes in the
tube.
|
Housing Ideas | Home
Copyright © 2002 MIHOG.org